Format menu
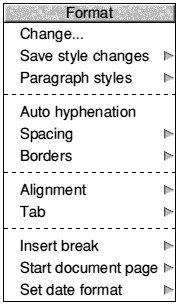
The Format menu contains commands that allow you to control the
formatting of the document, for example the number of columns, position
of headings, date formats, borders and style attributes of text and graphics.
Change...
The Change... command is used to apply changes to the formatting
attributes specific to the type of the currently selected structure. It
leads to a dialogue box where these attributes can be set.
Document, Chapter and Section
The Document, Chapter and Section format dialogue boxes are almost identical:
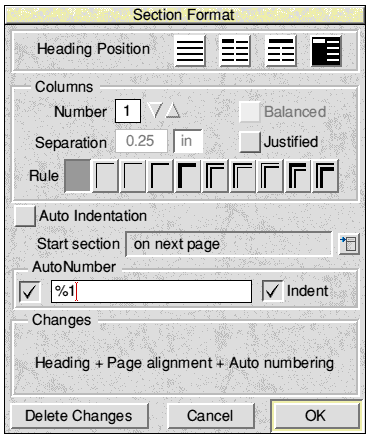
They allow you to:
- Choose the Heading position - None, In columns,
Above columns and Hanging.
- Choose up to 9 columns, balance their contents so that all columns
are the same length, vertically justify them and choose between a variety
of separation rules.
- Start Chapters and Sections immediately or on the next page and start
chapters on left or right hand pages.
- Suppress Paragraph indentation after Headings and change the numbering
system used in Headers and Footers.
- You can also number Chapters and Sections.
List
The List Format dialogue box is where you set the properties of a list.
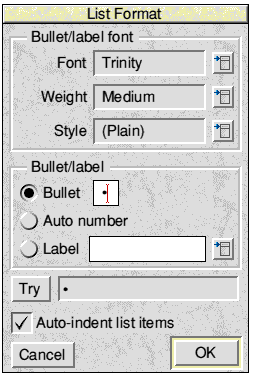
- You can choose the font and character used for the bullet.
- The bullet character can also be deleted if you want to type your
own character at the beginning of each list item, or leave it blank.
- Choose Auto indent to have a tab character inserted after the
bullet.
- You can also auto number lists.
Table
The Table dialogue box is where you set the properties of a table.
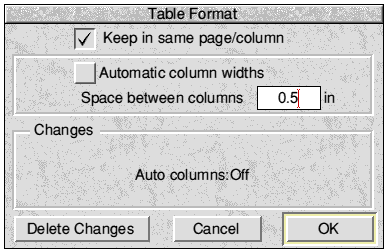
- Tables can be made to stay on the same page or in the same column.
- You can choose fixed width columns, which will word wrap, by turning
off Automatic column widths.
Figure
The Figure Format dialogue box is where you control the position
of a figures caption.
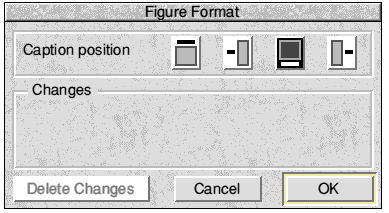
- Figures can have their captions above, below, left or right.
Picture
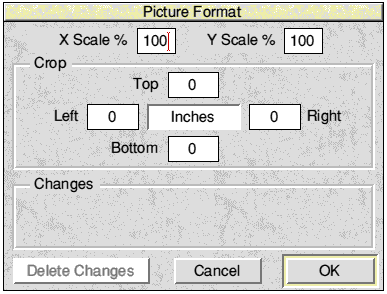
The Picture Format dialogue box lets you control the scale and
cropping of a picture.
You can:
- Choose a scaling factor for the picture between 10% and 999% independently
in both the
 axis and axis and  axis. axis.
- Crop pictures by typing a value in the top, bottom, left or right
writable icons.
- Move the picture frame out from the picture by typing a negative value
in the top, bottom, left or right writable icons.
- Change the unit of measurement by clicking on it.
- Double-clicking on a picture will also open the Picture Format
dialogue box.
Save Style Changes
This command is used either to apply formatting changes made to the
current selection to all the other structures using the same style, or
to create a new style.
- If style changes are made and saved with the same name then everything
in the document that uses that style will change to the new definition.
- If style changes are made and saved with a different name a new style
is created which may be applied to other structures to make them the
same.
You can also access the Save Style changes dialogue by clicking
Adjust on the Style indicator button.
<Structure> styles
This command changes name depending on which type of structure is selected.
It leads to a submenu containing the list of styles defined for that type.
Choosing a style from the list will cause the selection to be reformatted
in accordance with that style definition.
Each structure type has a default style which appears at the top of
the list. User defined styles are appended below it.
This menu can also be opened by clicking Menu on the Style
indicator button.
Auto hyphenation
The Auto hyphenation command turns hyphenation on or off for
the selected text. To hyphenate the entire document choose Document
from the Select menu then choose Auto hyphenation. When
hyphenation is on, a tick will appear to the left of the menu item.
The last word of a paragraph will not be hyphenated.
EasiWriter can hyphenate in most of the European languages. Use the
Country command from the Text menu to choose the language
to be used by the hyphenation routines on individual words, phrases, sentences,
structures or the entire document. German words containing 'ck' will be
hyphenated as 'k-k'.
For example the German for printer - Drucker becomes Drucker the first
'c' changing to a 'k'.
Spacing

Lets you change the space before and after the selected structure. Where
appropriate it also lets you adjust the spacing between lines of text.
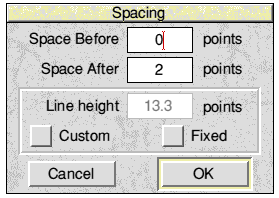
Click Custom to change the default line height. Double the existing
value for double line spacing.
Normally EasiWriter adjusts the height of lines to accommodate the tallest
item in the line, for example a picture or some text in a larger size
than the paragraph text. Click Fixed to fix the height of the line
to the line height of the paragraph shown in the dialogue box.
Borders

The Borders command leads to a dialogue box.
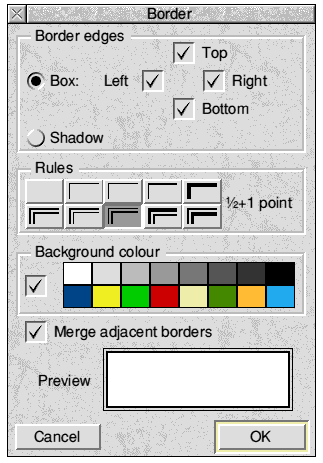
- You can apply borders to the top, bottom, left
& right of the currently selected structure.
- Vary the line type and thickness.
- Have a shadow effect
- You can apply a background colour and merge adjacent borders if, for
example, you want to put a border around a group of consecutive paragraphs.
Alignment
The Alignment command allows you to choose between Left,
Centre, Right and Full justification - equivalent
to clicking the justification icons on the ruler.
There is another command Force full which behaves like 'Full
justify', except that the last line of the paragraph, or line breaks forced
using Shift-Return, are also justified. Normally this is not good
typographic practice, but there are some cases where it can be useful.
The caption is placed at the right of the diagram by selecting
the figure, and using the Change command.
In this example there are four paragraphs, the first (ending 'side of
the') and the third (ending 'Change command.') have forced full
justification, so that they appear to flow round the diagram.
As a tool bar short-cut, Force full justification can be applied by
clicking on the Full (rightmost) justification button with Adjust .
Tab
The Tab command leads to a submenu offering the following choices:
Info
Info leads to a dialogue box where you can:
- Change the type, position and units of measurement of a selected tab.
- Edit (or add) the tab filler characters associated with a tab - up
to four characters.
- For decimal tabs only - change the decimal separator character. Normally
'.' or ',' but can be any character you choose.
Add
Allows you to add a new tab to the ruler.
Move
Enables you to move the selected tab or tabs. Note: the selection does
not have to be contiguous.
Delete
Allows you to remove the selected tab(s) from the ruler.
Insert break
Leads to a submenu with the following choices:
Page break
Starts a new page at the end of the paragraph containing the caret.
Column break
Starts a new column at the end of the paragraph containing the caret.
White space
Inserts an empty structure that can be stretched vertically using the
mouse. The minimum size is four points.
Page filler
Inserts an empty structure that automatically extends itself to the
bottom of the page. This can be used to force vertical rules to extend
to the full extent of the page.
Start <Structure> page
If the start of the selection is in a chapter or structure within a
chapter it leads to a dialogue box where you can set the start page number
for the chapter. If the selection is at the document level it starts the
numbering sequence for the document.
Set date format
The Set date format dialogue box allows you to choose the format
that EasiWriter will use to display dates and times that have been inserted
into the document using the Insert command from the Structure
menu. In addition to the built in date formats, you can create your own
by mixing date fields with text.
For example:
%WE the %ZDY%ST of %MO = Monday the 2nd of February
| Name
| Value
| Example
|
| %AM or %PM
| 'AM' or 'PM'
| am
|
| %WE
| weekday in full
| Thursday
|
| %W3
| weekday in three characters
| Thu
|
| %DY
| day of the month
| 01
|
| %ZDY
| day of the month (suppress zero)
| 1
|
| %MO
| month in full
| September
|
| %M3
| month in three characters
| Sep
|
| %MN
| month as number
| 09
|
| %ST
| 'st', 'nd', 'rd', 'th'
| st
|
| %CE
| century
| 19
|
| %YE
| year within century
| 97
|
A full description of how to use the date and time fields can be found
in the RISC OS User guide in the section system variables.
|
